CUDA를 공부하기.
쿠다를 공부하려고 오래 전 부터 마음먹었는데 실제로는 한 달 쯤 전부터 (정말 필요해진 순간에!) 공부하게 되었다. 회사에서 LLM 인퍼런스 모델을 이해해야 할 일이 생겨서, 동기가 강제로 부여되게 되어 겨우 쿠다 첫 걸음을 떼었다. 사실 아직 뗐다고 말 할 수 있는지도 잘 모르겠다.
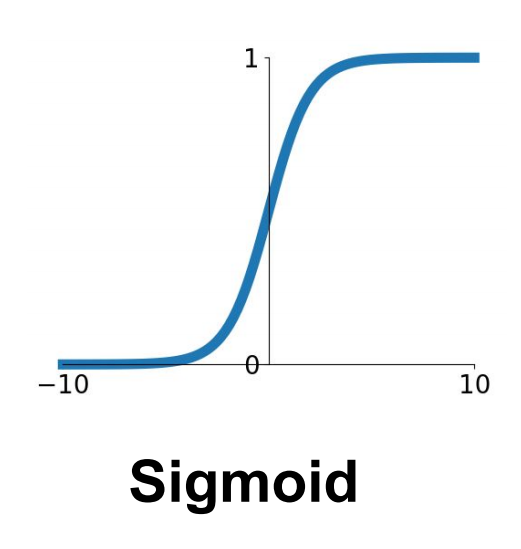
사진 출처:https://kjhov195.github.io/2020-01-07-activation_function_1
인터넷에 많이 있는 쿠다 자료의 특징은 난이도가 Sigmoid 함수를 따른다는 점이다. 쉬웠다가…쉬웠다가… 갑자기 어려워진다! 예를 들면 다음과 같다. 첫 예제에서 벡터 곱셈을 배우고, 두번째 예제에서 쿠다로 Quick Sort를 구현하고, 세 번째 예제에서는 CNN을 (심지어 backprop도) 구현하는 느낌의 난이도 배치가 되어 있다. 정말 학습자의 의욕을 정말 깎아먹지 않을 수가 없는 배치이다.
이 글의 목적은 벡터 덧셈 정도를 쿠다로 구현해 본 사람에게, 쿠다로 어텐션을 구현해 볼 수 있을 정도의 지식을 제공하는 것이다. 워프, 레인, shared memory 정도는 알고 있으면 좋다.
Attention
이 글을 읽는 사람은 셀프어텐션을 이해하고 있다고 가정한다. 어텐션 모듈은 구현 난이도도 적절하고(적어도 구현하기 전까지는 그렇게 보였다). 나온지 그렇게 오래되지 않았기 때문에, 아직 가장 효율적인 계산 방법이 알려지지 않았고, 여러 개선이 시도되고 있고 따라서 여러 번 많은 사람이나 회사가 다시 재작성되는 모듈이다. 그래서 구현해 볼 가치가 있다고 생각했다.
실제 구현체는 여기 있다. (깃허브 링크)
Warp Reduce Sum and Block Reduce Sum
template<typename T>
__inline__ __device__ T warpReduceSum(T val) {
#pragma unroll
  for (int mask = 16; mask > 0; mask >>= 1)
    val += __shfl_xor_sync(0xffffffff, val, mask, 32);
  return val;
}
코드 출처: https://github.com/vllm-project/vllm/blob/main/csrc/reduction_utils.cuh
쿠다에서 공유 메모리를 제외하고 다른 스레드의 값을 가져오는 유일한 방법은 _shfl* 함수를 사용하는 것이다. __shfl은 warp 내에서 다른 스레드의 값을 가져오는 연산이다. __shfl_xor_sync는 자기 스레드 아이디에, 주어진 세 번째 인자와 xor한 스레드 아이디의 같은 변수의 값을 가져오는 연산인데, xor은 다음과 같은 신기한 성질이 있어 이를 이용해 각 warp(32개 스레드의 그룹)의 합을 다음과 같이 계산할 수 있다.
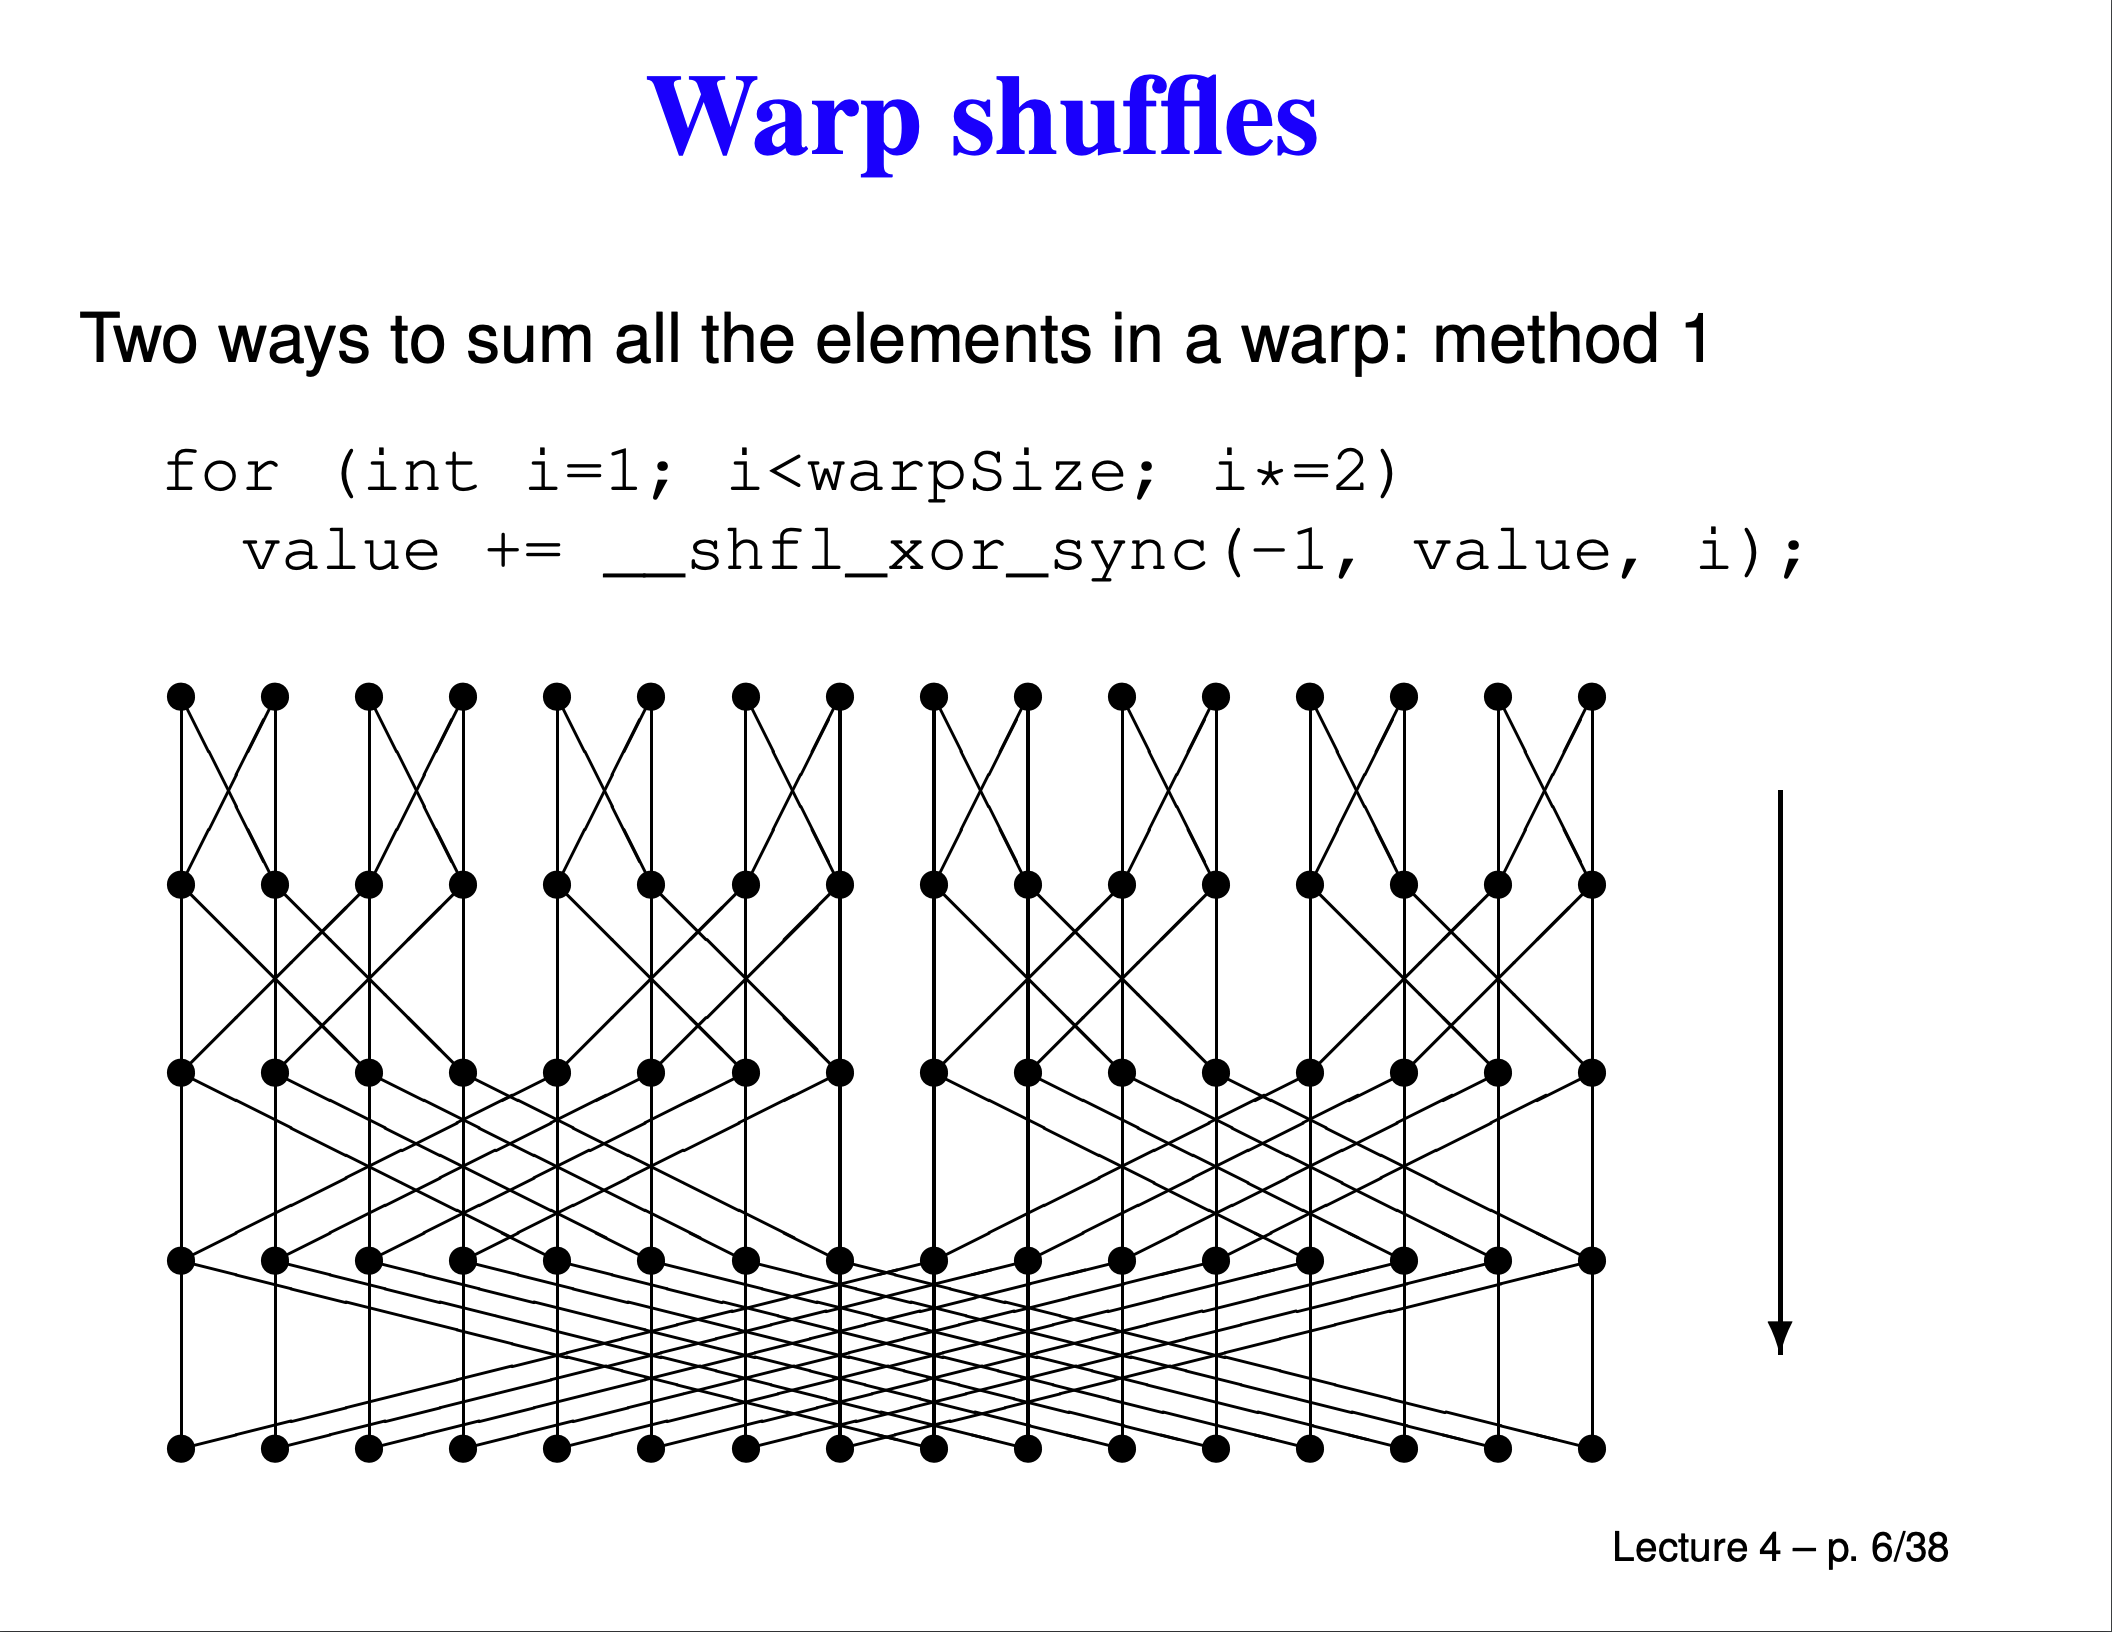 출처:https://people.maths.ox.ac.uk/~gilesm/cuda/lecs/lec4.pdf
그럼, 이 워프 계산을 마치면 0,…, 31까지는 같은 값이 있다(0-31까지의 합), 32,…,63까지는 또 같은 값이 있다.
그럼 다시, 이 32개의 값을 다시 한번 더 더해주면, 0-63까지의 합을 구할 수 있다. 이를 반복하면, 0-1023까지의 합을 구할 수 있다. 이를 이용해 다음과 같은 코드를 구현할 수 있다. 0, 32, 64, …,에 있는 값을 shared[]에 모아주고, shared[]의 모든 값을 더해주는 방식으로 thread 0 - thread 1023까지의 합을 구할 수 있다.
template<typename T>
__inline__ __device__ T blockReduceSum(T val) {
    static __shared__ T shared[32];
    if(threadIdx.x == 0) {
        for(int i = 0; i < 32;++i){
            shared[i] = 0.0;
        }
    }
    // 얘는 스레드 아이디
    int lane = threadIdx.x & 0x1f;

    // 워프의 아이디
    int wid = threadIdx.x >> 5;

    //각 워프 별로 sum을 계산한다. 워프 안의 모든 스레드는 같은 값을 가진다.
    val = warpReduceSum<T>(val);

    if (lane == 0)
        shared[wid] = val;
    __syncthreads();
    T ret = 0;
    for(int j = 0; j < 32;++j){
        ret += shared[j];
    }
  return ret;
}
코드 출처: https://github.com/vllm-project/vllm/blob/main/csrc/reduction_utils.cuh
참고 자료:
- https://people.maths.ox.ac.uk/~gilesm/cuda/lecs/lec4.pdf
- https://developer.nvidia.com/blog/using-cuda-warp-level-primitives/
Naive Attention
naive attention은 파이썬으로 구현하기 어렵지 않다.
def MHA(Q, K, V, mask=None):
    _Q = Q.reshape(batch_size, context_size, num_heads, dim // num_heads).permute(0, 2, 1, 3).reshape(batch_size * num_heads, context_size, dim // num_heads)
    _K = K.reshape(batch_size, context_size, num_heads, dim // num_heads).permute(0, 2, 1, 3).reshape(batch_size * num_heads, context_size, dim // num_heads)
    scale = (dim / num_heads) ** -0.5
    S = torch.bmm(_Q, _K.permute(0, 2, 1)).reshape(batch_size, num_heads, context_size, context_size)
    S *= scale
    if mask is not None:
        S += (mask.unsqueeze(1) - 1) * 100000.0
    P = S.softmax(dim=-1)
    O = torch.matmul(P, V.reshape(batch_size, context_size, num_heads, dim // num_heads).permute(0, 2, 1, 3))
    O = O.permute(0, 2, 1, 3).reshape(batch_size, context_size, dim)
    return S, P, O
얘는 대강 이런 입력을 받는다 Q, K, V는 각각 (batch_size, context_size, dim) 차원을 갖는 실수 텐서이며, mask는 (batch_size, context_size, context) 차원을 갖는 정수 텐서이다. 이러한 입력을 받는 c++ 코드는 이렇게 된다. 코드마다 주석을 달아 두었으니 이해하기 어렵지 않을 것이다.
std::vector<torch::Tensor> naive_attention_forward(
    torch::Tensor &Q,       // [batch_size, context_len, dim]
    torch::Tensor &K,       // [batch_size, context_len, dim]
    torch::Tensor &V,       // [batch_size, context_len, dim]
    torch::Tensor &mask,    // [batch_size, context_len, context_len]
    int num_heads
) {
    auto batch_size = Q.size(0);
    auto context_len = Q.size(1);
    auto dim = Q.size(2);

    // 텐서를 쿠다에 바로 이니셜라이즈하기 위해, 옵션을 미리 만들어 둔다.
    auto options = torch::TensorOptions().dtype(Q.scalar_type()).device(torch::kCUDA);
    auto S = torch::zeros({batch_size, num_heads, context_len, context_len}, options);
    auto P = torch::zeros({batch_size, num_heads, context_len, context_len}, options);
    auto O = torch::zeros_like(Q);
    // context_size가 1024보다 클 수도 있지만, 쿠다의 max threads 크기는 1024
    const int threads = std::min((int)context_len, 1024);

    // 각 배치와 각 헤드마다 같은 연산이 반복되므로, 얘내를 블록으로 보아 계산한다
    const dim3 blocks(batch_size, num_heads);

    // 토치 코드를 실행하기 위해 필요한 스트림을 가져온다.
    const cudaStream_t stream = at::cuda::getCurrentCUDAStream();
    // 이건 그냥 MHA에 필요한 거다
    float scale = 1.0 / std::sqrt(float(dim) / num_heads);

    // 파이토치의 AT_DISPATCH_FLOATING_TYPES_AND_HALF 매크로는 바인딩해준다. 템플릿 함수를 16bit float, 32bit float에 대해 realize해준다.
    AT_DISPATCH_FLOATING_TYPES_AND_HALF(
        Q.scalar_type(),
        "naive_attention_forward_kernel",
        ([&] {
            naive_attention_forward_kernel<<<blocks, threads, 0, stream>>>(
                context_len,
                dim / num_heads,
                scale,
                Q.data_ptr<scalar_t>(), // data의 pointer를 리턴한다. 이러면 쿠다에서 바로 사용할 수 있는 디바이스 메모리를 리턴한다.
                K.data_ptr<scalar_t>(),
                V.data_ptr<scalar_t>(),
                mask.data_ptr<scalar_t>(),
                S.data_ptr<scalar_t>(),
                P.data_ptr<scalar_t>(),
                O.data_ptr<scalar_t>()
            );
        })
    );
    return {S, P, O};
}
naive_attention_forward는 다음과 같이 이루어져 있다.
template <typename scalar_t>
__global__ void naive_attention_forward_kernel(
    const int context_len,
    const int dim,
    const float scale,
    scalar_t* __restrict__ Q, // __restrict__ 키워드는 포인터가 가리키는 메모리가
                              // 다른 포인터에 의해 접근되지 않는다는 것을 컴파일러에게 알려준다.
    scalar_t* __restrict__ K, // 캐싱할 유리해져 속도 향상에 도움을 줄 수 있다.
    scalar_t* __restrict__ V,
    scalar_t* __restrict__ mask,
    scalar_t* __restrict__ S,
    scalar_t* __restrict__ P,
    scalar_t* __restrict__ O
) {
    const int thread_id     = threadIdx.x;
    const int block_dim     = blockDim.x;
    const int batch_id      = blockIdx.x;
    const int head_id       = blockIdx.y;
    const int batch_size    = gridDim.x;
    const int num_heads     = gridDim.y;

    // Q has shape      [batch_size, context_len, num_heads, dim]
    // K has shape      [batch_size, context_len, num_heads, dim]
    // mask has shape   [batch_size, context_len, context_len]
    for(int i = thread_id; i < context_len; i += block_dim) {
        for(int j = 0; j < context_len; ++j) {
            // 여기 indexing이 되게 지리멸렬한데, 익숙해지면 (쓰는 사람은) 나름 불편하지 않게 사용할 수 있다.
            int S_idx = (num_heads * context_len * context_len) * batch_id + \
                        (context_len * context_len) * head_id + \
                        (context_len) * i + j;
            // S[S_idx]는 사실 S[batch_id][head_id][i][j]를 의미한다.

            if (mask[(context_len * context_len) * batch_id + context_len * i + j] > 0){
                for(int k = 0; k < dim; ++k) {
                    // 여기 Q_idx, K_idx도 마찬가지다.
                    int Q_idx = (context_len * num_heads * dim) * batch_id + \
                                (dim) * head_id + \
                                (num_heads * dim) * i + k;
                    // Q[batch_id][i][head_id][k]를 의미한다.
                    int K_idx = (context_len * num_heads * dim) * batch_id + \
                                (dim) * head_id + \
                                (num_heads * dim) * j + k;
                    // K[batch_id][j][head_id][k]를 의미한다.
                    S[S_idx] += (scalar_t)((Q[Q_idx] * K[K_idx]) * scale);
                }
            } else {
                S[S_idx] = -100000.0;
            }
        }
    }
    ...
    ...
}
쿠다 코드에서 3차원 이상의 텐서는 이렇게 인덱싱해 곱하고 더해주고 할 수 있다. 이것만 기억하면 (느리겠지만) 아무쪼록 쿠다 코드를 짤 수 있다. 위 코드에서는 S (Q*K)를 구하는 부분만 보여주었지만, 나머지는 사실 저 부분과 크게 차이가 나지 않는 곱셈의 연속이다.
Continuous Batching
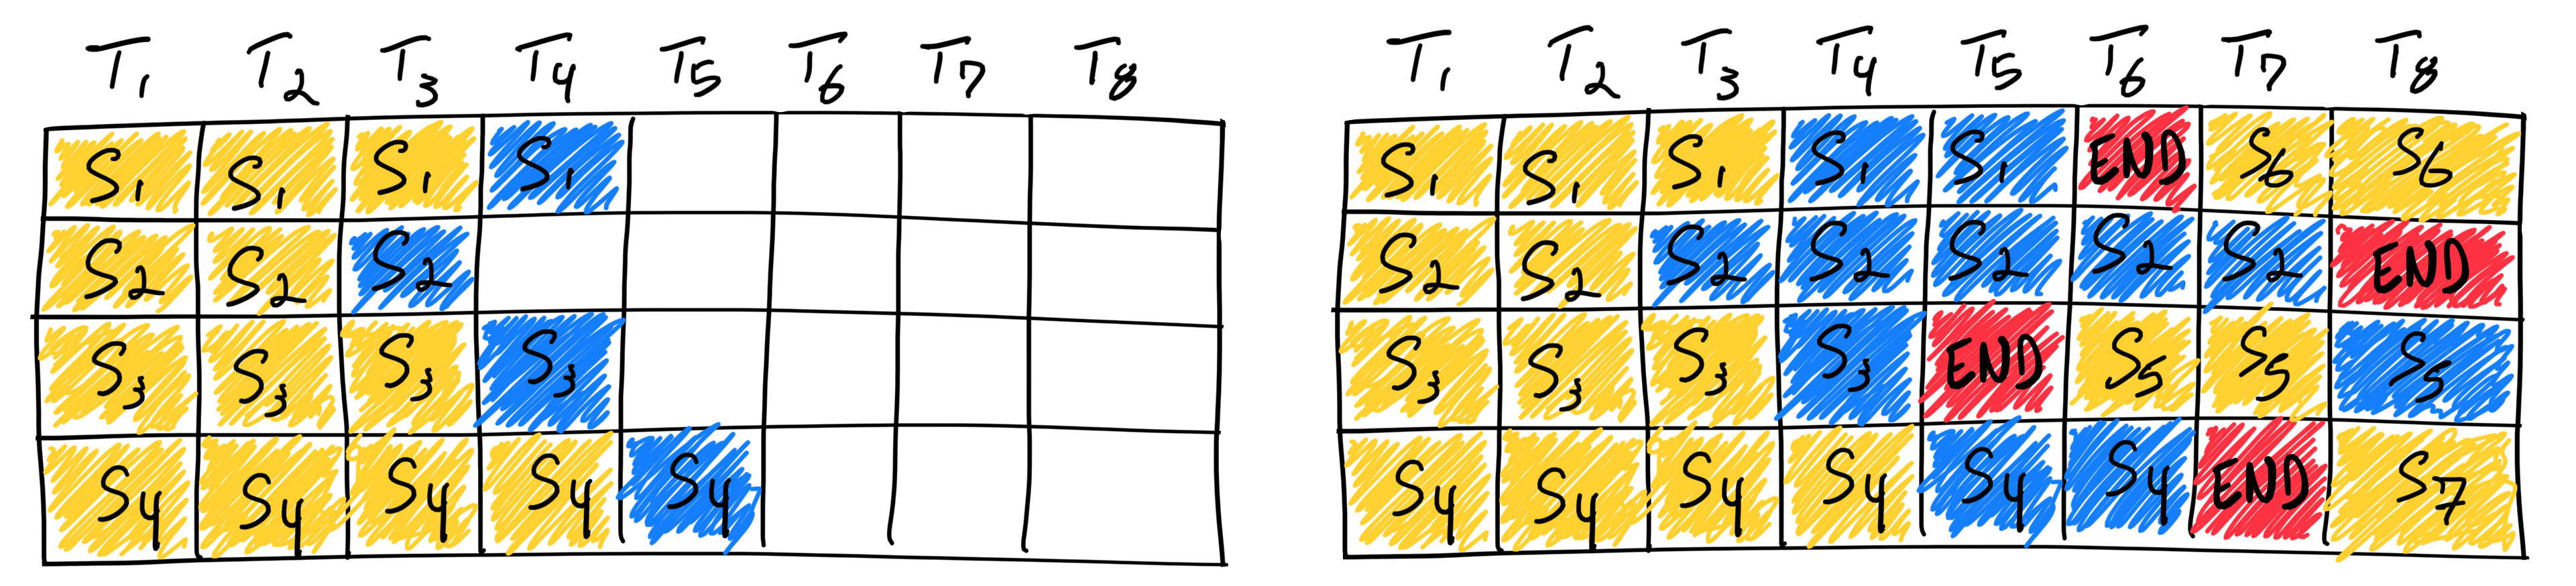
출처: https://www.anyscale.com/blog/continuous-batching-llm-inference
sequence data로 torch를 사용해본 사람은 padding에 대해 기억하고 있을 것이다. 입력 시퀀스마다 길이가 다를 수 있지만, 입력으로 들어가는 텐서는 길이가 같아야 한다. 따라서 패딩과 마스크를 보통 사용하는데, 이러면 새 입력이 들어왔을 때 시퀀스 길이가 늘어나거나 줄어드는 경우도 있고 잘 생각해보면 여러모로 불편하다. 위 그림의 오른쪽 배칭은 cont. batching을 보여주고 있다. 그냥 패딩 대신 packed된 입력을 준다. 이렇게 하면 패딩과 마스크를 사용하지 않을 수 있다. 자세한 설명은 위 출처를 참고하자.
차이점 Q, K, V의 차원이 (batch_size, context_size, dim)에서, (total length, dim) 차원으로 바뀌게 된다. offset [batch_size] 차원의 텐서가 추가된다. 이는 각 배치의 Q, K, V에서의 종료 위치를 나타내게 된다. 이를테면, context length 3인 입력 3개로 이루어진 배치가 있다고 하면, offset = [3, 6, 9]가 되게 된다.
KV Cache and PagedAttention
decoder only LLM 모델에서 한 시퀀스에 대해, 각 레이어의 K, V는 한 번 계산되면 그 시퀀스 내에서는 값이 고정된다. 그럼 어텐션 연산을 여러 번 해 줄 필요 없이 이 값을 어딘가에 들고 있으면 된다. 이를 KV Cache라고 한다.
일반적인 KV Cache는 max sequence length분량의 연속된 메모리를 미리 할당해주어야 한다는 점이 있는데, 이는 심각한 메모리 부족을 초래한다. 이렇게 하지 말고, 필요시마다 그때그때 불연속적인 메모리를 할당하는 방법이 제안되었는데, 이를 Paged Attention이라고 한다. 불연속적 메모리를 사용하면서 발생하는 캐시 비효율 등의 문제가 있지만, 메모리를 효율적으로 사용할 수 있다는 장점이 있어 널리 사용되고 있다. 가장 단순하게, 할당 단위가 1인 paged attention의 구현을 해 보자.
여기선 offset, K_cache, V_cache, cache_indices라는 추가적인 인자가 필요해진다. cache indices는 각 쿼리가 쓰는 K_cache, V_cache의 인덱스들을 담고 있고, offsets는 배치 안 쿼리들 사이에 어떤 K_cache, V_cache 사이즈를 담고 있다. 이런 노테이션이 익숙하지 않다면, 위키의 CSR matrix 부분을 참고하면 된다. 예를 들면,
cache_indices = [33, 26, 111, 63]
offsets = [2, 4]
라고 하면, [0, 2)까지의 캐시 인덱스들인 {33, 26}은 첫 번째 쿼리의 KV cache 인덱스가 된다. [2, 4) 까지의 캐시 인덱스인 {111, 63}은 두 번째 쿼리의 KV cache 인덱스가 된다. 구현체는 다음과 같다.
template <typename scalar_t>
__global__ void paged_kv_attention_forward_kernel(
    const int max_context_len,
    const int dim,
    const float scale,
    scalar_t* __restrict__ Q,               // [length, num_heads, dim]
    scalar_t* __restrict__ K,               // [length, num_heads, dim]
    scalar_t* __restrict__ V,               // [length, num_heads, dim]
    scalar_t* __restrict__ K_cache,         // [cache_size, num_heads, dim]
    scalar_t* __restrict__ V_cache,         // [cache_size, num_heads, dim]
    int* __restrict__ cache_indices,        // [length]
    int* __restrict__ offsets,              // [batch_size]
    scalar_t* __restrict__ S,               // [batch_size, num_heads, max_context_len + 1]
    scalar_t* __restrict__ P,               // [batch_size, num_heads, max_context_len + 1]
    scalar_t* __restrict__ O                // [length, num_heads, dim]
) {
    const int thread_id = threadIdx.x;
    const int block_dim = blockDim.x;
    const int block_id = blockIdx.x;
    const int head_id = blockIdx.y;
    const int batch_size = gridDim.x;
    const int num_heads = gridDim.y;

    const int beg_idx = (block_id == 0)? 0 : offsets[block_id - 1];
    const int end_idx = offsets[block_id];
    const int size = end_idx - beg_idx;

     // S[i] = K_cache[i][j] * Q[j];
    for(int i = thread_id; i < size; i += block_dim) {
        int S_idx = ((1 + max_context_len) * num_heads) * block_id + \
                    (1 + max_context_len) * head_id + i;
        for(int j = 0;j < dim; ++j) {
            // S[block_id][head_id][i] += K_cache[cache_indices[beg_idx + 1]][head_id][j] * Q[block_id][head_id][j]을 실제로는 계산한다.
            int K_cache_idx = (dim) * head_id + (num_heads * dim) * cache_indices[beg_idx + i] + j;
            int Q_idx = (num_heads * dim) * block_id + dim * head_id + j;
            S[S_idx] += K_cache[K_cache_idx] * Q[Q_idx];
        }
    }

    // 위 루프에서는 0,...,context_len까지만 계산한다. 그럼 context_len + 1번째 원소는 어떻게 계산할까?
    // context_len + 1번째 원소는 K, Q의 self attention이므로 직접 계산해준다.
    __syncthreads();
    scalar_t tmp = 0.0;
    for(int i = thread_id; i < dim; i += block_dim) {
        int Q_idx = (num_heads * dim) * block_id + dim * head_id + i;
        int K_idx = Q_idx;
        tmp += Q[Q_idx] * K[K_idx];
    }

    S[(num_heads * (1 + max_context_len)) * block_id + (max_context_len + 1) * head_id + size] = blockReduceSum<float>(tmp);

    ...
    //밑에서는 P, O를 비슷한 방법으로 계산해준다.
}
다음 할 일
공부하면 할 수록 하고 싶은 일이 늘어난다. 추가적으로 더 해 보고 싶은 것들이 많다.
- 더 빠르게 만들 수 있을 것 같다. FlashAttention을 구현해보고 싶다. 지금 내 구현체에서는 shared memory를 거의 활용하지 않는데, 이로 계산을 훨씬 효율적이게 할 수 있을 것 같다.
- 메모리도 적게 쓸 수 있을 것 같다. Self-attention Does Not Need O(n2) Memory을 보면, 어텐션은 사실 메모리 효율적인 구현이 가능하다고 하다.
- CUDA intrinsic 연산을 더 잘 활용할 수 있을 것 같다. 이것도 좀 참고해볼 만한 것이 있으면 좋을 것 같은데 아직까지는 잘 모르겠다. 혼자 배우니 막히는 부분이 많은 것 같다 ;ㅅ;
내가 본 자료들
쿠다를 이해하기 위해서 지금까지 참고한 자료 중 기억에 남는 것들이다. 읽고 도움이 되었으면 좋겠다.
-
Learn CUDA Programming 그나마 난이도가 현실적이고 순차적이고 계단적이게 되어 있다!
-
CUSTOM C++ AND CUDA EXTENSIONS 여기 cuda 구현체가 설명이 상당히 자세해서 이해하기 쉽다. 대부분 머신러닝을 하는 사람은 pyTorch같은 곳에 응용하길 원할 거 같은데 이 자료는 그것도 설명을 아주 자세히 해 두었다!
-
vLLM pagedAttention 모듈은 어려운데, 이 외 부분은 이해하기 쉽게 작성되어 있다. 초보를 갓 벗어난(아직초보일지도모름) 사람에게 딱 적절한 난이도의 실제 코드를 볼 수 있다.
-
대학교 강의자료 전반적으로 어려운데, 그 때 그 때 내가 참고할 수 있는 부분이 있어서 그 부분만 따로 읽어 보았다. reduction 파트